I recently picked up a Starlink Mini to use as a backup connection for my home network. With the new £4.50 standby plan, it's a great way to keep things online if my FTTP connection fails.
My primary FTTP connection is generally excellent offering 5ms latency at best, having a backup; something that is reliant on a string of satelites 600Km above the earth is just fascinating to me.
Enter Starlink Mini#
Starlink Mini is SpaceX's compact satellite dish. It's portable and for this use case - it can be put into 'Standby Mode' for just £4.50 per month.
The £4.50 Standby Plan#
In August 2025, Starlink replaced their free 'Pause Mode' with a paid 'Standby Mode'. It's pretty reasonable:
- You can restart full bandwidth service whenever you need it
- You get unlimited low-speed data (500kbps) in standby - enough bandwidth for apps such as Google Meet, FaceTime, Claude, and even low quality Netflix.
- It's cheaper than most mobile data plans you could use as a backup
The hardware cost#
The Starlink Mini itself costs £159. That's reasonable for a satellite internet backup solution, and significantly cheaper than most 4G/5G backup solutions with similar capabilities. It has the advantage of working pretty much anywhere with a view of the sky so no relying on mobile network coverage.
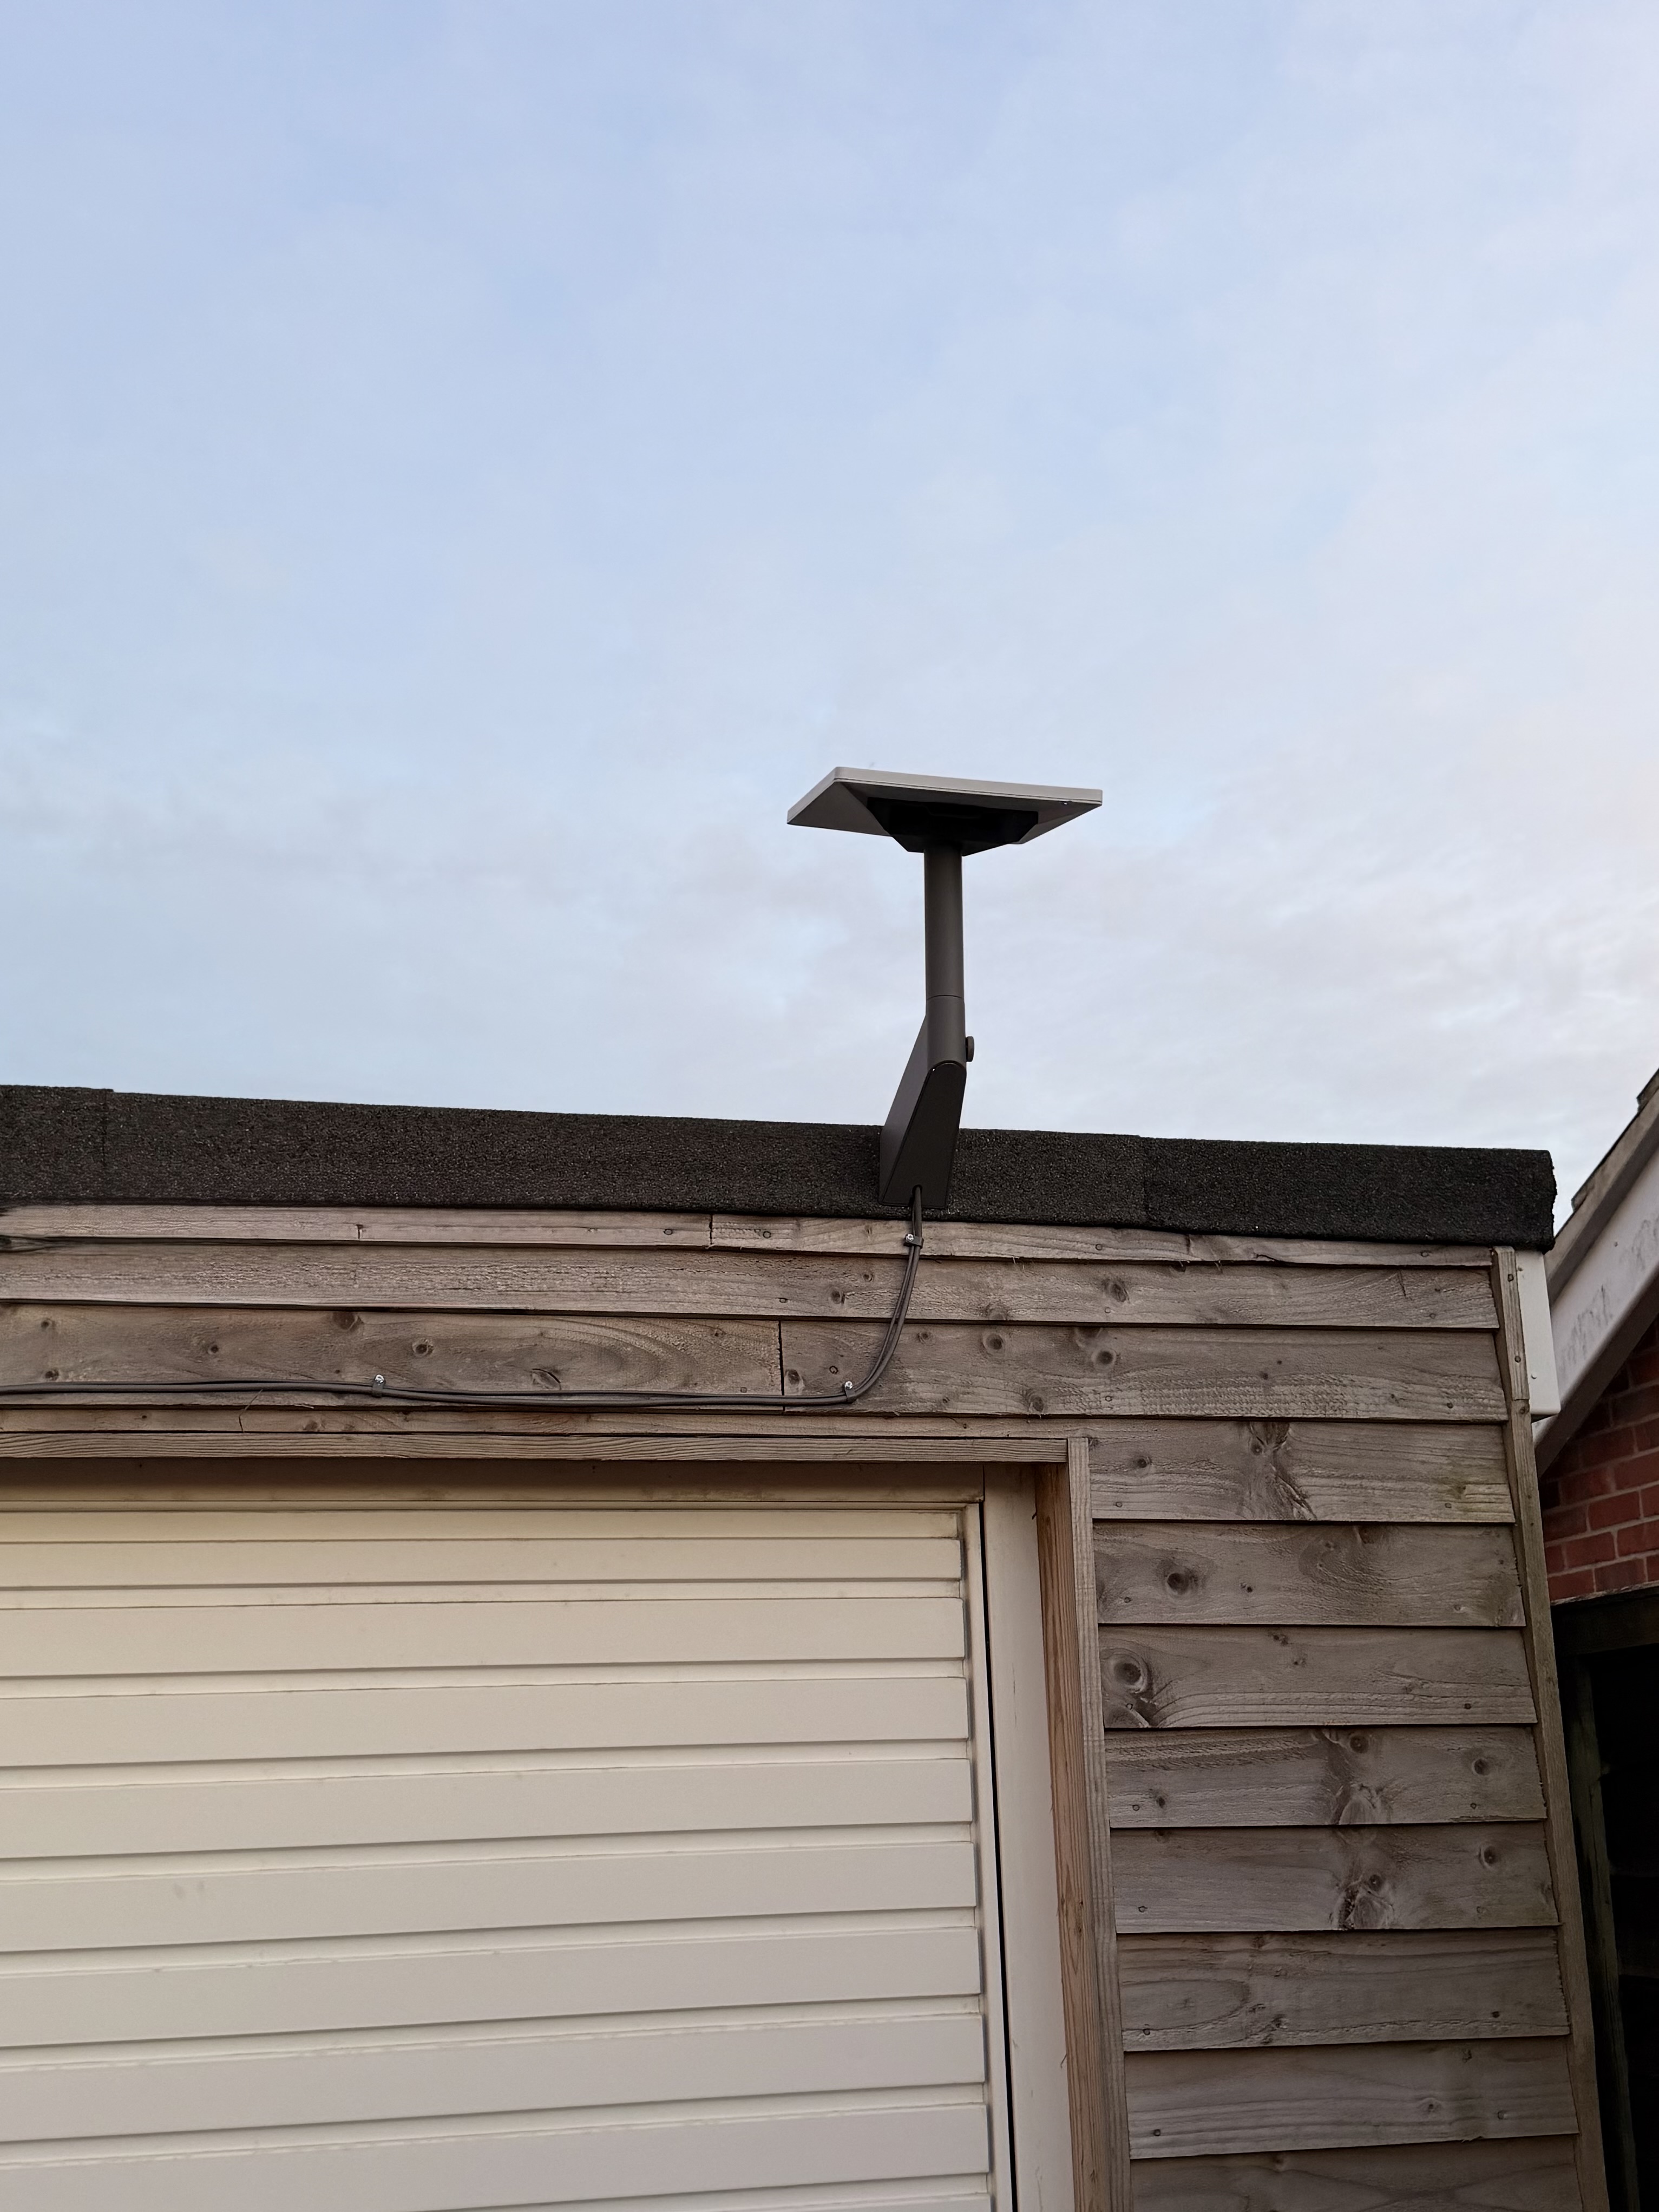
Starlink sells a Mini Wall Mount for just £8, which seems too cheap? It comes with decent wood screws and very good cable clips that can hold both the power and Ethernet cables together. It's a solid piece of kit and I'd highly recommend picking one up.
General Observations#
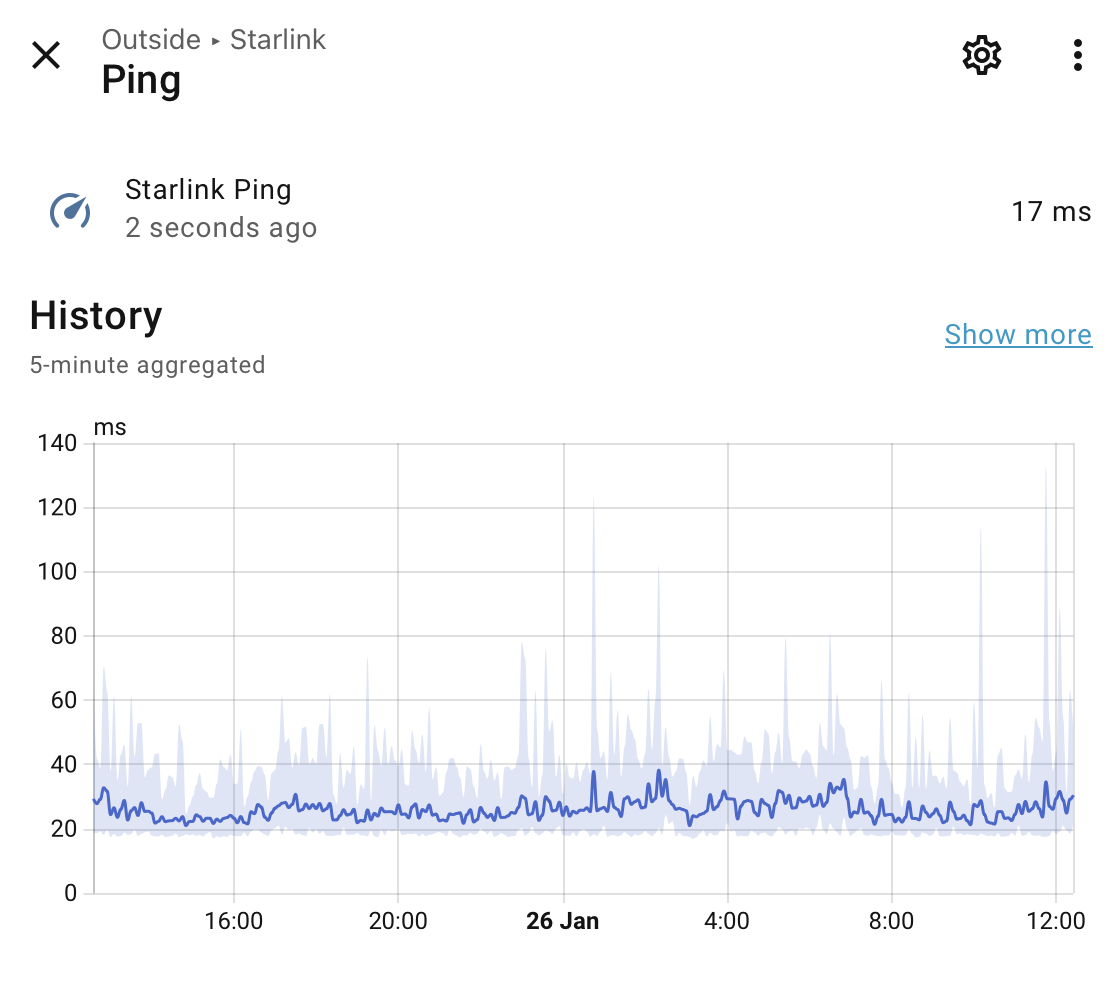
- Latency is really decent - 18ms to 1.1.1.1, spiking to 65ms. The mean has been 26ms.
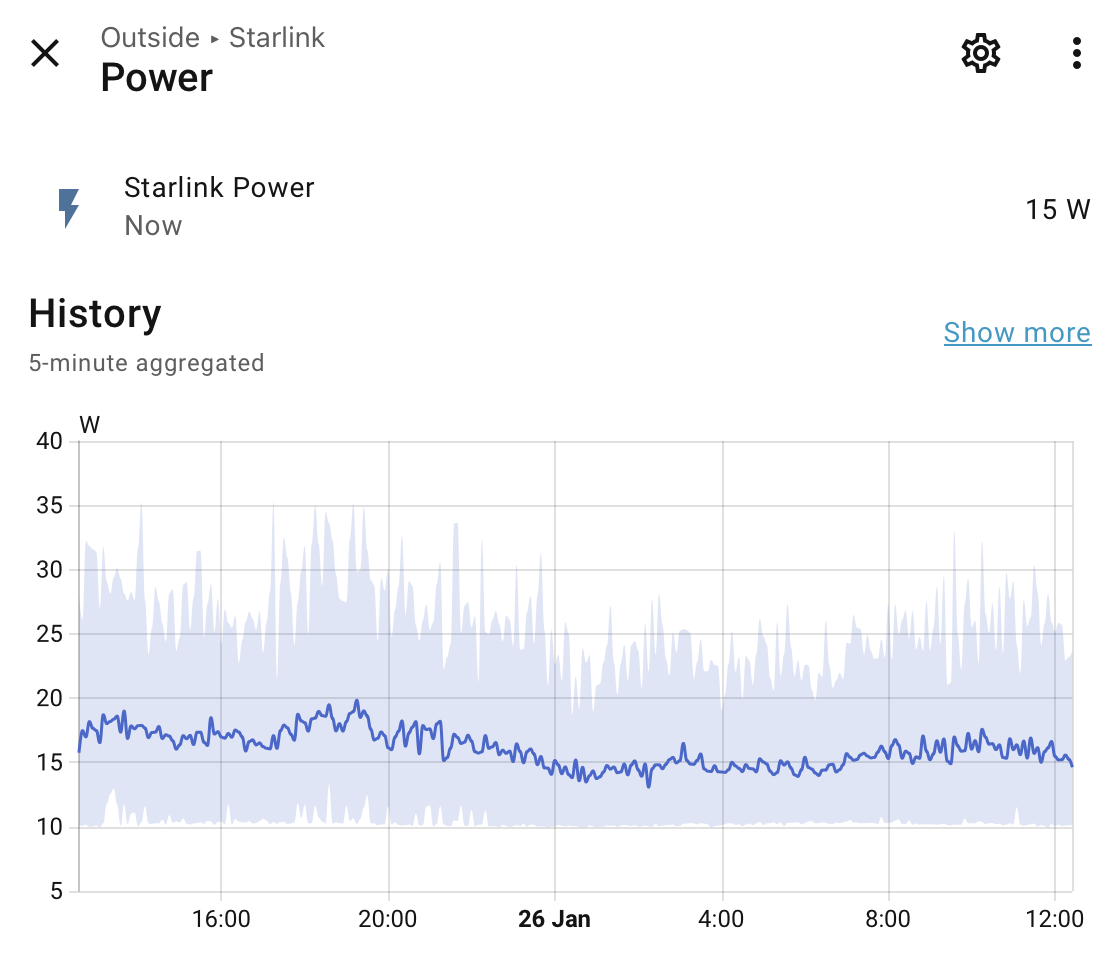
- Starlink Mini average power draw is now around 13w thanks to a recent software update.
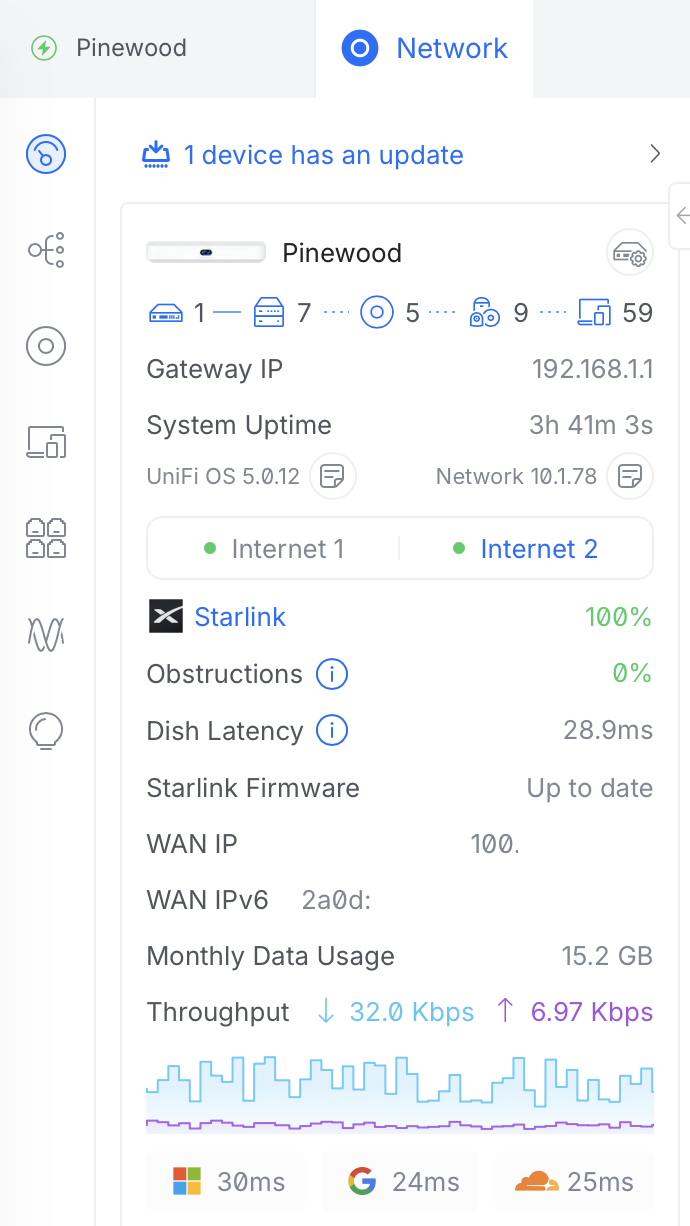
- UniFi just added the ability to see obstructions and dish latency to the UniFi Dashboard - neat.
- Starlink just launched 100Mbps, 200Mbps and 'Max' with speeds 400Mbps+
- Starlink are offering a free Starlink Mini if you subscribe to the Residential Max plan
- The dish needs a relatively clear view of the sky - but can work behind a thin layer such as glass. A partially obscured view is still usable due to it's adaptive antenna technology.
- Setup is genuinely simple - plug it in, point it skyward, wait 5-10 minutes
- The Starlink app is surprisingly decent for monitoring and configuration
IPv6 Configuration with UniFi isn't pretty#
One thing that caught me out was getting IPv6 working properly. Starlink supports IPv6 natively but it requires a bit of configuration on the UniFi side to work correctly. There's a bug in UniFi that prevents the default IPv6 route from being assigned automatically, which means you'll need to fix it manually.
Starlink uses Carrier-Grade NAT (CGNAT) which makes port forwarding impossible on IPv4. If you're hosting anything this can be solved by using a Cloudflare Tunnel. IPv6 also solves this by giving you a proper routable address space.
Starlink allocates a /56 IPv6 prefix via DHCPv6 Prefix Delegation.
Here's how to get it working with UniFi gear:
Initial Configuration#
Navigate to your WAN settings (Settings → Internet → Primary WAN):
- Set 'Advanced' to 'Manual'
- Enable IPv6
- Set IPv6 Connection to SLAAC (this is critical - SLAAC must be used, not DHCPv6)
- Uncheck 'Auto' on Prefix Delegation
- Set 'Prefix Delegation Size' to 56
Apply the settings and you should see an IPv6 address appear in the 'Internet' field. Now enable IPv6 on your LAN networks using SLAAC for address assignment.
At this point you might think everything is working, but if you try to access IPv6 resources from your LAN clients, you'll find they can't route properly. This is because of a bug in UniFi.
The UniFi IPv6 Routing Bug#
UniFi has a problem where it doesn't automatically assign the default IPv6 route. You'll need to fix this manually via SSH.
Step 1: SSH into your UniFi device (UDM, UDM Pro, etc.)
If you need to set SSH keys first, go to Control Plane → Console → SSH and configure them. The username is root and the password is what you set in the console settings.
Step 2: Check if the default route is missing
ip -6 route show default
This will likely return blank, confirming the problem.
Step 3: Wait for a Router Advertisement
Run a TCP dump to capture the Router Advertisement from Starlink:
tcpdump -i eth7 -vvv icmp6
Wait for an RA (Router Advertisement) packet. It'll look something like this:
10:51:39.297010 IP6 fe80::200:6edd:3e00:101 > ff02::1: ICMP6, router advertisement, length 104
The important bit is the IPv6 link-local address at the start (fe80::200:6edd:3e00:101 in this example). This is your default gateway.
Step 4: Add the default route manually
Replace the IPv6 address and interface with your own values:
ip -6 route add default via fe80::200:6edd:3e00:101 dev eth7
Note: eth7 is typically the WAN interface on a UDM Pro. For other UniFi devices it might be different (e.g., eth4 on a standard UDM).
Step 5: Test from your LAN clients
Try pinging an IPv6 address or visiting an IPv6-only website. It should work now.
Important Warning#
This fix is not persistent across UniFi firmware updates. If you update your UniFi device, there's a chance the default route will be removed and you'll need to add it again.
You can either:
- Manually re-run the command after each update
- Create a boot script that checks for and adds the route automatically
For a persistent solution, you could create a script at /data/on_boot.d/20-ipv6-route.sh:
#!/bin/sh

# Check if default IPv6 route exists
if ! ip -6 route show default | grep -q default; then
    # Wait for RA and add route
    # Replace with your gateway and interface
    ip -6 route add default via fe80::200:6edd:3e00:101 dev eth7
fi
Make it executable: chmod +x /data/on_boot.d/20-ipv6-route.sh
Things to bear in mind#
- Starlink's IPv6 addresses are dynamic - they can change, so don't rely on them being static
- The default route fix needs to be re-applied after firmware updates (unless you use a boot script)
- Test from multiple devices to ensure IPv6 is working properly across your network
- Credit to the r/Starlink community for documenting this workaround
Automatic failover#
The beauty of having Starlink as a secondary WAN connection is that UniFi makes failover pretty straightforward. Configure your Starlink connection as WAN2, set up load balancing with failover priority, and you're done. If my primary connection drops, traffic automatically routes via Starlink.
Off grid#
There's another brilliant benefit I hadn't initially considered: power cuts. I have solar battery storage that keeps the house running during power outages, and because Starlink isn't dependent on local infrastructure (which might also be affected by the same power cut), the internet keeps working. My FTTP connection goes through local cabinets and equipment that stop working when the power goes out, but Starlink just keeps going.
If you've set up Starlink failover with UniFi or run into similar IPv6 quirks, I'd love to hear how it went, drop a comment below.
Comments